The presence of wet or dry rot – not to mention wood beetle – can set alarm bells ringing for most renovators. Chartered surveyor Ian Rock explains how to get to the bottom of timber decay, and why eradicating damp is key.
Most homeowners have heard horror stories about dry rot. But there is more than one type of fungal decay that can afflict an existing home; the other well-known variety being wet rot. Both these mushroom-like fungi are members of an elite club of building defects ennobled with Latin titles. It is the fearsome reputation of the former, serpula lacrymans, however, that really strikes fear into the hearts of renovators and homebuyers.
Some experts consider the terms ‘wet’ and ‘dry’ rot to be a tad simplistic. Fungal decay to timber can be more accurately categorised as ‘brown’ or ‘white’ — the former including all types of dry rot and its close relative, cellar fungus. In the white camp are most types of wet rot, but not all. Nonetheless, surveys generally stick with the traditional terminology that most homeowners and buyers are familiar with.
As if having to deal with outbreaks of rot wasn’t bad enough, there is another timber-consuming predator with a similar potency to inspire shock and awe — the wood beetle. So how worried should you be if your survey flags up timber decay or beetle infestation?
Discovering that a property you want to renovate is afflicted with timber decay could potentially mean having to devote a significant chunk of your budget to resolving the problem. However, the odd spot of rot in the skirting needn’t be a deal-breaker and it’s extremely common for older properties to have a few old boreholes as evidence of past attack by wood-boring insects. To ascertain the likely cost of treating the problem, it’s important in the first instance to carefully investigate the extent to which timbers are affected and assess the true causes.
One potential concern is that at the slightest sniff of rot or beetle, mortgage lenders have a tendency to insist upon ‘further investigations’ which can often result in unnecessary, sales-driven treatments.
Overkill
Past approaches to treating rot or suspected beetle infestation were often draconian, involving the cutting out and burning of timbers within several metres of an outbreak, hacking off large expanses of plasterwork, and spraying chemicals that are now considered too toxic for safe use, with unpleasant side effects to human health.
Blanket spraying of chemicals was rarely very effective because of restricted access to structural timbers such as joist ends embedded in walls. Spraying also had the undesirable side effect of killing off the ‘friendly’ natural predators of wood beetles and larvae, like spiders and shiny house beetles — not to mention being potentially harmful to bats, a protected species.
Today a more measured approach is taken to treating rot and beetle, and the first job is to identify precisely what you’re dealing with (see below for more). Do bear in mind, however, that if the building is listed, the repair and replacement work will typically need to be carried out on a like-for-like basis and meet the approval of the local authority’s conservation officer.
Damp, Decaying Timber and Wet Rot
Identification
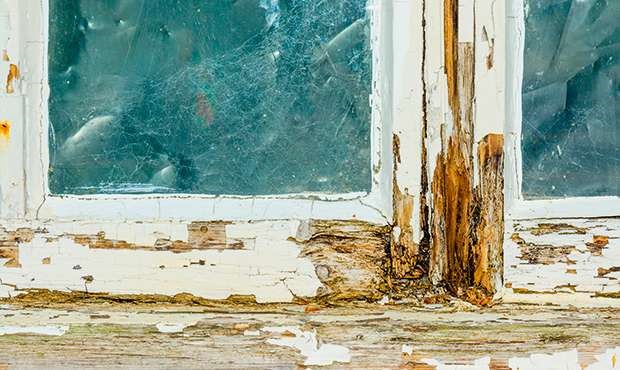
Wet rot can take hold where timber has become wet over time, often near ground level, in close proximity to damp walls, or due to leaks. Rotten wood has a soft, spongy feel, caving in easily when prodded with a screwdriver, is typically cracked along the grain, and is usually still wet.
Implications
In very severe cases, structural timbers such as ground floor joists may have rotted through, potentially causing collapse, but most outbreaks are localised with minimal impact, perhaps affecting the odd stretch of skirting. Wet rot thrives best in damp, dark and poorly ventilated places. So timber lintels and the ends of floor joists embedded in damp walls are areas that can be at risk if moisture isn’t free to evaporate away.
External joinery is also commonly affected where water accumulates and can’t drain away freely. Window frames, for example, are especially vulnerable around the lower cill area. But it can also attack window and door frames on the inside, as condensation drips down the glass.
Remedial Work
For wood to be attractive to wet rot, its moisture content has to rise above about 20 per cent, so the obvious solution is to eliminate the cause of the damp. Decayed timber can then be cut out and replaced, and adjacent wood treated with rot fluid.
New timbers should be pretreated and protected from damp; e.g. supported in joist hangers rather than set directly into the walls. Any wood in contact with a wall can be shielded by placing a strip of plastic damp-proof course underneath.
Airbricks are essential to ventilate and dry out moisture under floors, and in an average house there should be two or three airbricks on opposite walls to achieve a decent through-flow of air. This means clearing any blocked existing airbricks or inserting new ones into the lower walls. The cost of inserting a new 215x140mm terracotta airbrick (or plastic vent) externally and making good will be in the region of £110 in a solid brick wall home, and £55 in a cavity walled property. (Where paving slabs need to be removed or cut, or a concrete driveway cut away, add in the region of £60 to the job.)
Minor damage to joinery, such as window frames, can sometimes be repaired by drying the affected wood and then using a wood hardener; this is a resin that soaks in. Small areas of decayed wood can be cut out and adjoining surfaces allowed to dry before being treated with rot fluid, and splicing in new matching strips of timber, sealing any small gaps with filler.
Alternatively, stretches of skirting may be replaced. Removing existing skirting and replacing it with new, rounded 19x150mm softwood skirting will cost around £10m/length.
More serious damage requires the wood to be completely replaced. Damaged joists, for instance, can be cut back to good wood, treated with a preservative, and have an extension piece bolted on.
Dry Rot
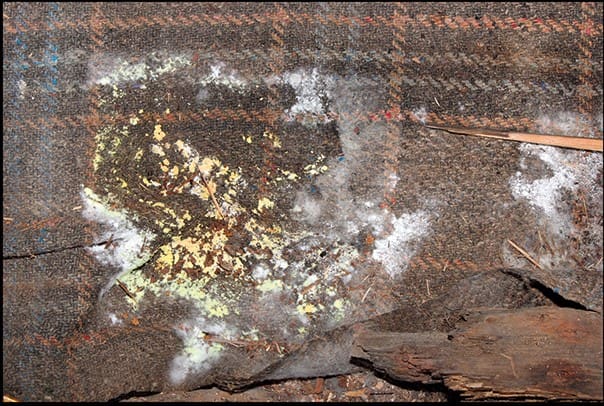
Once airbourne spores settle on damp timber, a grey fungus tinged with lilac and yellow develops. This sucks the moisture from the wood causing it to become dry and brittle
Identification
Airborne fungal spores can take ‘root’ on moist timber, thriving best in cool, poorly ventilated spaces, leading to dry rot. It’s sometimes misdiagnosed because its appearance is constantly changing.
Depending on what lifecycle stage it’s at, dry rot may display:
- a small cube-shaped cracking pattern
- fungus growth
- grey strands extending outwards
- Infected wood typically feels dry and brittle, adopting a pale brown colour.
‘Cellar fungus’ is frequently mistaken for dry rot as it thrives in the same sort of conditions and displays very similar symptoms, with an almost identical fruiting body. The main difference is the mycelium strands are black-brown rather than grey-white.
Implications
Dry rot has a fearsome reputation because of its ability to self-propagate and spread through neglected buildings. By sapping the strength from timber joists, it can ultimately cause structural damage and even lead to collapse. But caught in time, most outbreaks are quite localised, often only affecting non-structural joinery.
However, it’s not always possible to get accurate quotes until the full extent of the problem is known. This could mean stripping out floors, ceilings and fitted units. To treat dry rot in a kitchen floor, for example, everything may have to come out — the kitchen units, appliances, flooring and even low-level plasterwork. If you are planning to gut and renovate a property this shouldn’t be too much of a major issue, but if not, this could involve considerable expense.
To understand what you’re dealing with, it’s worth taking a brief look at the lifecycle of dry rot.
- Once airborne spores settle on damp timber they start to sprout thin grey root strands that spread across the surface of the wood.
- The wood is soon covered by a thick web that looks like grey cotton wool, with lilac and yellow tinges.
- The fungus sucks the moisture from the wood, leaving it dry, brittle and structurally weak.
- The final stage is a pancake-shaped fruiting body, which emits millions of spores that float off into the air — ready to start the cycle all over again!
Remedial Work
The source of damp must first be identified and fixed, and ventilation improved before remedial work can be undertaken. Without damp, the spores will not germinate and the timber will be safe. Common sources of moisture include:
- damp walls
- leaks from defective pipes
- baths or showers
- leaking gutters
- excessive indoor condensation
Once allowed to dry out, the strands should naturally die off. A dehumidifier can help speed up the drying out process.
Where rot has attacked structural timbers, like lintels, then physical repairs may be needed. But before condemning an affected piece of timber, you may find that the core is still sound. Prodding the timber with a penknife or using a micro drill can quickly determine the condition of the heartwood beneath the surface; if there is firm resistance, the timber may be salvageable.
Badly affected timber cannot be treated and must be cut out and burned; the removal of the cellulose ‘food source’ will stop the spread of growth. This should be replaced with new, pretreated lengths of timber, or for lintels you can use inert materials such as concrete or steel (unless it’s a listed building, where like-for-like repairs are usually required).
In severe cases, targeted boron-based treatments can be applied to help preserve remaining sound timber, or the timber can be treated with a suitable fungicide.
Zinc oxychloride (ZOC) paints are sometimes applied as a protective coating. But remember with older buildings it’s important to maintain breathability, so a dry, well-ventilated environment should be sufficient.
Where masonry or plasterwork has been affected by ‘cobweb’ strands, they must be brushed off and surfaces sterilised with special fungicides, and allowed to dry out.
Wood Beetle
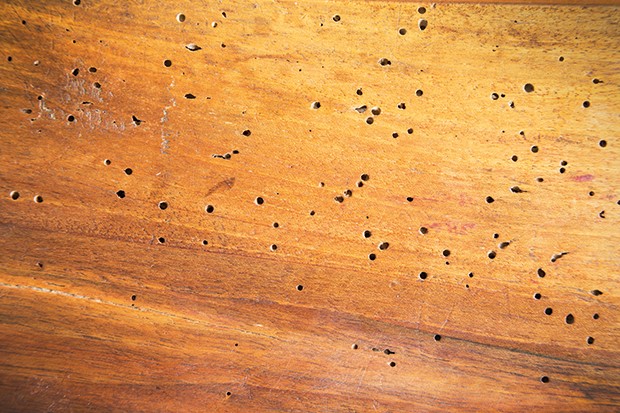
Flight holes are a telltale sign of wood-boring beetles, but may be from a past infestation
Identification
Beetle infestation may sound like something out of a Dr Who-inspired nightmare, but in most cases it isn’t a serious issue; it may simply require careful investigation and localised treatment. Look for telltale ‘flight holes’ of about 1mm in diameter (or 3mm for death-watch beetles).
When the insects lay eggs inside a piece of wood, they eventually hatch as larvae and bore their way out, emerging as adult beetles from early spring to summer, creating these holes. Fresh holes show clean, white wood inside, and active infestation is characterised by piles of very fine timber dust (frass).
Common places to find wood beetle include:
- floorboards (areas where infested furniture has stood are particularly prone)
- under the stairs
- behind timber panelling and skirting boards
- around loft hatches
Implications
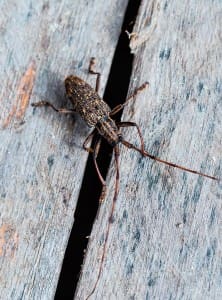
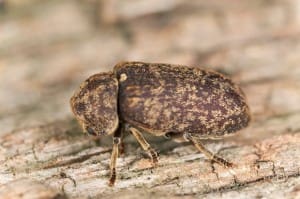
Furniture beetle is by far the most common type of wood beetle. Its lesser-known cousins, longhorn and powderpost beetles, live a far more secluded life. However, it also has a ‘bigger brother’ — the dramatically named death-watch beetle.
Left: a longhorn beetle, right: a death-watch beetle
Fortunately, these celebs of the insect world rarely trouble homeowners because of their refined tastes — they prefer to dine out on old hardwood found in period buildings such as churches. Either way, the boreholes these creatures leave behind will, in most cases, be quite old and no longer active, having been repeatedly sprayed every time the house has been sold or remortgaged.
Furniture beetle infestation rarely extends much deeper than the outermost few millimetres, and rarely affects the structural integrity of the timber. This is because the surface sapwood is easier to consume than the tougher heartwood. In order for beetle infestation to take hold, the moisture content of the wood needs to consistently be above 15 per cent.
Poorer-quality timber is most at risk, and softwood floorboards are potentially vulnerable due to their thin width. Where boards have been stripped, you can often see the remnants of little bore tunnels, typically confined to an area close to the surface. But only on rare occasions does this result in a board becoming seriously weakened.
Remedial Work
To judge whether infestation is still active, check whether the flight holes are clean and light. The simplest method of testing timbers potentially at risk is to glue tissue paper over the flight holes using wallpaper paste, or alternatively wax polish timber surfaces. Then observe whether this is chewed through as the insects emerge in the spring.
Where a length of load-bearing timber shows signs of beetle attack, non-destructive testing can be carried out by carefully drilling into the timber using a micro drill with a long, fine bit. Where the core is sound it will offer resistance.
Paying a small fee to a specialist testing firm will, in most cases, work out cheaper than a sales-driven ‘free’ survey; these tend to recommend a lot of unnecessary and expensive work.
As with fungal attack, wood beetle will only cause serious damage where there is damp present. So, again, the source should be identified and remedied, be it by fixing leaks, lowering external ground levels, or installing new airbricks (see above for costs) in lower walls or clearing existing ones.
Heated buildings are hostile environments for wood beetle, and once the dampness has been resolved and timber allowed to dry out, with improved ventilation and reduced moisture content, the beetle colony should naturally die out over time.
If you have a serious and active outbreak, then in addition to the above works, a targeted application of insecticide to the affected areas can sometimes be justified. Special gels and pastes containing permethrin are most effective. Treating timbers with anti-woodworm fluid will cost in the region of £6/m².
Images: Shutterstock

